PERFORMANCE AIRSPEEDS FOR THE SOARING CHALLENGED
After eighteen
years administering FAA practical tests, I have concluded that a lot of glider
pilots and flight instructors are not entirely comfortable with the relationship
between performance airspeeds and polar curves. If graphs look like way too much
math for you, maybe the following explanation will help.
Suppose we have four Schweizer SGS 1-26 gliders, identical except for color.
For our test, we will line them up and fly them at the speeds and sink rates in
the following table:
| Glider
| 
| 
| 
| 
|
| Airspeed
| 26 Knots
| 31 Knots
| 42 Knots
| 62 Knots
|
| Sink Rate
| 1.8 Knots
| 1.6 Knots
| 1.9 Knots
| 3.2 Knots |
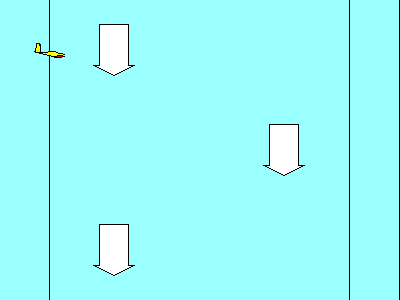
| If the four gliders start together and proceed in the same direction
at their respective speeds and sink rates, a side view will look like
this. After one minute, their positions relative to their starting points
will be shown by the distance graph (for simplicity we will let one knot =
100 feet per minute - the error is trivial). That means that the blue
glider has flown 2600 feet horizontally and 180 feet vertically.
Similarly, the green glider has flown 3100' horizontally and 160'
vertically, the yellow glider 4200' horizontally and 190' vertically, and
the red glider 6200' horizontally and 320' vertically. |
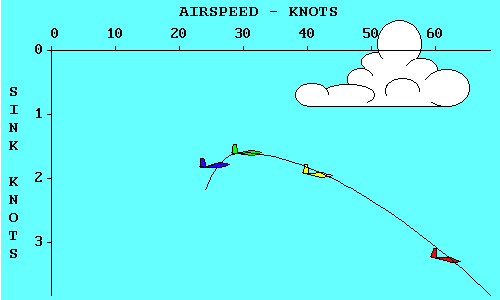
| Now if we connect the gliders with a smooth curve and change the
distance scales to speed scales, we have just drawn a polar curve for the
Schweizer SGS 1-26. |
So, what can we do with a polar curve?
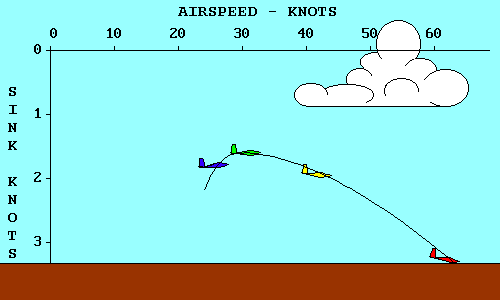
| Lets pretend we started this exercise with the gliders 320 feet above
the ground. The red glider is already touching down (actually crashing
because we didn't allow any room for a flare). If we continue the descent
of the other gliders until the blue and yellow gliders also reach the
surface, we see several things. First, the yellow glider goes farther than
any other while losing 320 feet. The blue glider touched down about the
same time, but doesn't go nearly as far. The green glider is still in the
air, but will crash on top of the red glider if it isn't moved quickly.
|
Two of these gliders represent significant points on a polar curve.
| The green glider has the lowest sink rate of any. It will keep you in
the air for the longest time, but will not go very far. Note that its
glide path intersects the polar curve at its highest point. If we move up
from the highest point on the polar curve to the airspeed scale we find
that the minimum sink speed for a SGS 1-26 is 31 knots (35 mph). If we
move horizontally to the left we find that the minimum sink rate is 1.6
knots (160 feet per minute). |
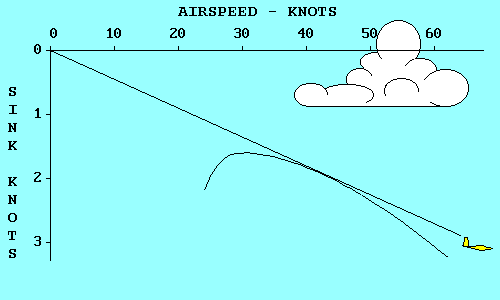
| The yellow glider has the best glide ratio of all. That means that it
will glide farther in still air than any other glider, for a given loss of
altitude. A line from the origin (0, 0 point) of the graph, that is
tangent to (just touches) the polar curve represents the glide path of the
yellow glider. If we move up from the point where the line touches the
polar curve to the airspeed scale, we find that the speed that produces
this best glide is 42 knots (48 mph). If we move horizontally to the left
from the tangent point we find the corresponding sink rate, 1.9 knots (190
feet per minute). |
If air was always still, that's all we'd need to know about polar curves.
Minimum sink speed would keep us in the air for the longest time and best glide
speed would allow us to go the greatest distance. Fortunately for glider pilots,
air frequently moves both vertically and horizontally. When it goes up faster
than our sink rate within it we can climb. When it goes down we need to modify
our best glide speed to optimize our flight through sinking air.
| To see how sinking air affects our glide let's compare the red and
yellow gliders. If both enter an air mass that is sinking at 300 feet per
minute (3 knots), their sink rates will increase accordingly. The yellow
glider is now sinking at 4.9 kts (1.9 within the air mass plus 3 for the
air mass sink rate). The red glider is now sinking at 6.2 kts (3.2 + 3.0).
Both enter the air mass at the same altitude; our objective is to come out
the other side with the least loss of altitude. Although the red glider is
sinking faster, it is also moving horizontally much faster (62kts vs 42
kts). The result is that it gets out of the sinking air at a higher
altitude than the yellow glider. The red glider has a better glide ratio,
relative to the ground, than the yellow one even though the yellow glider
has a better glide ratio relative to the air mass. |
By now you may have noticed that the speeds for our gliders in these
examples were not selected randomly. The green glider is flying at Minimum Sink
Speed, the yellow glider at Best Glide Speed (also called best L/D Speed because
the glide ratio in still air is numerically equal to the ratio of lift to drag),
and the red glider is flying at the Speed to Fly for a SGS 1-26 flying in an air
mass that is sinking at 300 feet per minute. For now we will define Speed to Fly
as the speed that results in the flattest glide in both convection and wind
because it was so defined by the FAA in the predecessor to the Practical Test
Standards. Now let's look at how Speed to Fly can be determined from the polar
curve for any air mass sink rate.
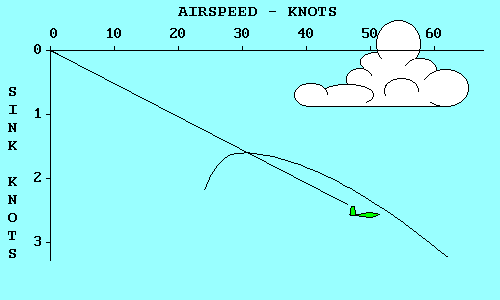
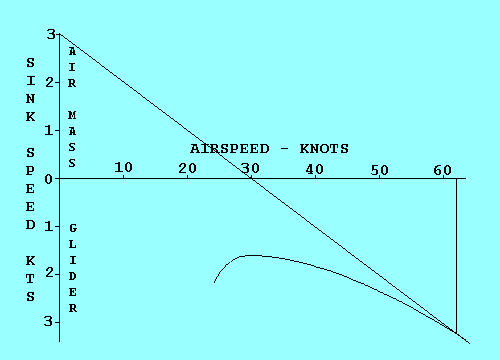
| In our previous examples our polar curve showed performance relative
to the air mass in which the glider was flying. It was valid relative to
the ground only in still air. To be valid relative to the ground the curve
must be displaced in the direction and by the amount that the air mass is
moving. In this example the air is sinking at 300 feet per minute (3 kts),
so we move the curve down 3 kts.
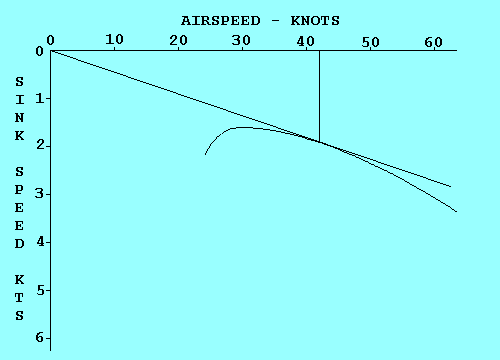
To determine the Speed to Fly for any condition, we draw a line from
the origin that is just tangent to the curve. Then we draw a line straight
up from the tangent point to the speed scale. In this case the Speed to
Fly is 62 kts. Did that surprise you? |
If you were trying to determine Speed to Fly from a polar curve drawn on a
piece of paper (maybe for a pilot examiner), you would find it inconvenient to
redraw the curve for each air mass sink rate.
| An easier way to accomplish the same objective is to raise the origin
of the graph by an amount equal to the air mass sink rate and then draw a
tangent to the original curve from that point. To keep our examples
consistent, let's assume a 3 knot air mass sink rate and move the origin
up 3 knots. Now the tangent to the original curve occurs at the same 62
knots we found in the previous example. When using this method be sure to
remember that the glider sink rate is the sum of its sink rate within the
air mass and the sink rate of the air mass itself. In this case it is 6.2
kts (air mass sink of 3 kts plus glider sink within the air mass of 3.2
kts = 6.2 kts). |
We can use the same technique to determine the Speed to Fly for any motion
of the air mass.
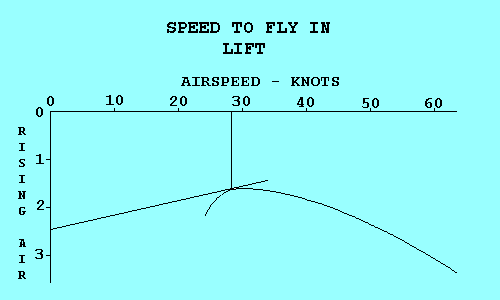
| If the air is rising we displace the origin down by an amount equal to
the rate at which the air is going up, and then draw a tangent from that
point to the polar curve. This gives a valid speed only if we plan to fly
straight through the lift. If we plan to circle in the lift, other factors
determine the speed that will optimize our climb rate.
For a headwind we displace the origin to the right, using the airspeed
scale to determine how far we move it. For a tailwind we displace the
origin to the left. |
We can also combine vertical
and horizontal air mass movement when both exist. The example shows how to
combine sink and a headwind.
You may be thinking, "This is all very interesting, but how do I use it in
the air. I'm not going to carry polar curve charts with me in the glider and
draw tangents for each condition I encounter." You are right. The information
derived here must be converted to cockpit displays and/or rules of thumb to use
in flight.
First let's discuss headwinds and tailwinds. You have to estimate their
values so a rule of thumb is as good as anything. If you were to evaluate
several different wind conditions graphically, you would find that the tangent
point moves about half as far as the origin. Thus, a good rule would be "Add
about half the estimated value of a headwind, and subtract about half the value
of a tailwind from the Speed to Fly determined for lift or sink."
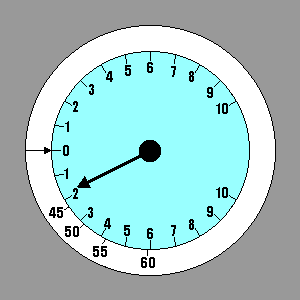
| For lift and sink we have an instrument in the glider to give us the
necessary information. The process used to determine Speed to Fly gives us
the sink rate of the air mass and the sink rate of the glider within the
air mass. Their total is the value that would be indicated on the
variometer. We could select a few representative values of Speed to Fly
and stick them on the panel adjacent to the corresponding variometer
readings, using a label maker. A better method is to invest in a speed
ring for the glider/variometer combination we have. The speed ring is
adjustable, but for our current definition of Speed to Fly it should be
set with the arrow on the ring pointing to "0" on the variometer. Then
when the variometer points to any rate of descent it is also pointing to
the corresponding Speed to Fly - the one that will produce the flattest
glide under those conditions. Our example shows Speed to Fly varying from
42 kts in still air to 62 kts in 3 kt sink. |
If you only want to know enough about performance airspeeds to pass the FAA
practical test you probably could stop here. The FAA wants you to understand the
concepts well enough so you don't do something dumb like trying to stretch a
glide by pulling back on the stick when you should be pushing forward.
| Although the Speeds to Fly that we have been discussing so far are the
ones that will let you glide to that safe landing spot if any will, they
are too slow to win contests and too slow for most cross-country flights.
In these cases we are more interested in covering the ground in the
shortest time rather than obtaining the flattest glide. That introduces a
new definition of Speed to Fly.
Credit for developing this concept of Speed to Fly is usually given to
Paul MacCready, and the speed ring discussed earlier is usually called a
MacCready speed ring. Cross-country flights utilizing thermals consist of
alternately climbing in one thermal and gliding to the next. MacCready
noted that the Speed to Fly between thermals should be based on the
strength of the thermals. If the thermals are strong you can fly faster
than the speed that produces the flattest glide. You will lose more
altitude, but you make up for it by climbing faster in the next thermal.
Thus you reach the top of the next thermal sooner than you would have at
the lower speed. |
| We can analyze Speed to Fly in this case by using the same technique
we used for flattest glide in sinking air, except that we offset the polar
curve origin by the rate of climb we expect in the next thermal instead of
air mass sink rate. To illustrate the similarity we assume a climb rate of
3 kts and see that the graph is identical to the one with 3 kts sink
except for the labels. It shows that the Speed to Fly between thermals in
still air is 62 kts if you expect to climb at 3 kts in the next thermal.
An added benefit is that the average cross-country speed, including the
time spent circling in thermals, can be estimated by the point on the
airspeed scale where the tangent line crosses the scale.
|
Now we see why the speed ring can be rotated about the variometer. If we
expect our climb rate to be 3 kts, we set the arrow on the ring opposite where
the vario indicates 3 kts climb. Note that the Speeds to Fly also move so that a
higher speed is indicated for all sink rates. In this example the Speed to Fly
in still air is 62 kts, just as the graph predicted. The sink rate in still air
at this speed is 3.2 kts, as it has been for the red glider throughout this
analysis.

| Some pilots might question using a climb rate in the next thermal, one
that has not yet been attained, to set the speed ring. They should try to
remember the last time they made a decision with complete information. In
this case one could base the estimate on the climb rate in the last
thermal, modified by an assessment of conditions ahead and whether they
appear to be improving or deteriorating. Once set, the value selected is
still subject to change. A good way to think of the MacCready setting is
that it represents the minimum climb rate that the pilot is willing to
stop for. As altitude decreases and the prospects of landing out increase,
the prudent pilot will accept weaker thermals, and the MacCready ring
should be set accordingly. A really desperate pilot should set the ring to
zero to maximize the area to be searched for a thermal.
|
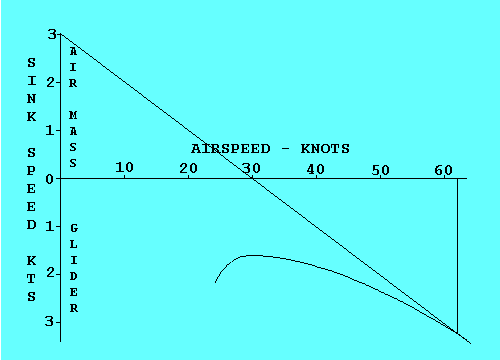
The performance data used here is based on a SGS 1-26 at 575 pounds gross
weight, as shown in Appendix A, The Joy of Soaring.
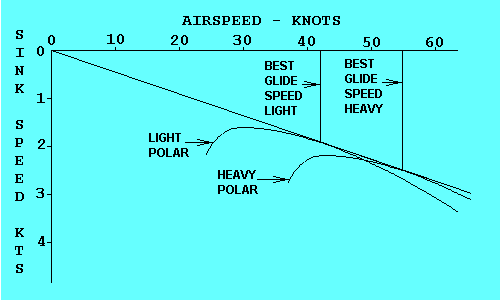
| A different polar curve exists for the same glider at every gross
weight. As the weight increases the polar moves down and to the right and
becomes a little flatter, but retains approximately the same shape. Both
airspeed and sink rate increase for equivalent points on the curves, but
their ratio remains the same. Both heavy and light glider achieve the same
best glide ratio, as shown here, but the heavy glider does so at a higher
speed. This is the reason for carrying ballast to improve glide
performance when the thermals are strong enough, even though the climb
rate suffers. |
© 2000 Jim D. Burch
Back to: Top 10 ways to fail a checkride